06_使用nexus创建私服
# 一、前言
私服是一种特殊的 Maven 远程仓库,通过建立自己的私服,就可以降低中央仓库负荷、节省外网带宽、加速 Maven 构建、自己部署构件等,从而高效地使用 Maven。
# 一、Nexus 安装
Nexus 是典型的 JavaWeb 应用,它有两种安装包:
- 一种是包含 Jetty 容器的 Bundle 包
- 另一种是不包含 Web 容器的 war 包。
# 1.下载地址
# 2.安装
将下载后的 zip 解压之后,会发现包含如下两个子目录:
- nexus-3.14.0-04 :即 HOME 目录,该目录包含了 Nexus 运行所需要的文件,如启动脚本、依赖 jar 包等。
- sonatype-work :即工作目录,该目录包含 Nexus 生成的配置文件、日志文件、仓库文件等。Nexus 会在运行时创建此目录。需要备份 nexus 的时候,备份此目录即可。
# 3.启动
用户只需要调用对应操作系统的脚本就可以启动 Nexus。
windows 下,以管理员权限运行 cmd,进入到 bin 目录,然后执行如下命令:
nexus.exe /run
# 二、Nexus 的仓库与仓库组
# 1.内置仓库
# 1.1 仓库信息
仓库主要包含如下信息
- 仓库类型:
- group(仓库组)
- hosted(宿主)
- proxy(代理)
- virtual(虚拟)
- 仓库格式:
- maven2
- maven1
- Policy(策略)
- Release(发布版本仓库)
- Snapshot(快照版本仓库)
- 仓库状态
- 仓库路径
# 1.2 内置仓库列表
| 序号 | 仓库 | 描述 |
|---|---|---|
| 1 | MavenCentral | 该仓库代理 Maven 中央仓库,其策略为 Release,因此只会下载和缓存中央仓库中的发布版本构件 |
| 2 | Releases | 这是一个策略为 Release 的宿主类型仓库,用来部署组织内部的发布版本构件 |
| 3 | Snapshots | 这是一个策略为 Snapshot 的宿主类型仓库,用来部署组织内部的快照版本构件 |
| 4 | 3rd party | 这是一个策略为 Release 的宿主类型仓库,用来部署无法从公共仓库获得的第三方发布版本构件 |
| 5 | Apache Snapshots | 这是一个策略为 Snapshot 的代理仓库,用来代理 ApacheMaven 仓库的快照版本构件 |
| 6 | Codehaus Snapshots | 这是一个策略为 Snapshot 的代理仓库,用来代理 CodehausMaven 仓库的快照版本构件 |
| 7 | Google Code | 这是一个策略为 Release 的代理仓库,用来代理 GoogleCodeMaven 仓库的发布版本构件 |
| 8 | java.net-Maven 2 | 这是一个策略为 Release 的代理仓库,用来代理 java.netMaven 仓库的发布版本构件 |
| 9 | Public Repositories | 该仓库组将上述所有策略为 Release 的仓库聚合并通过一致的地址提供服务 |
| 10 | Public Snapshot Repositories | 该仓库组将上述所有策略为 Snapshot 的仓库聚合并通过一致的地址提供服务 |
# 2.仓库分类
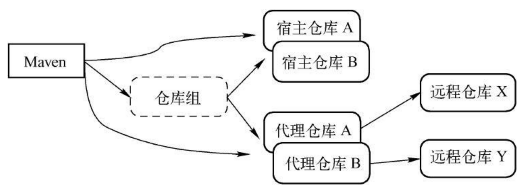
- Maven 可以直接从宿主仓库下载构件;
- Maven 也可以从代理仓库下载构件,而代理仓库会间接地从远程仓库下载并缓存构件;
- 最后,为了方便,Maven 可以从仓库组下载构件,而仓库组没有实际内容(图中用虚线表示),它会转向其包含的宿主仓库或者代理仓库获得实际构件的内容。
# 2.1 创建宿主仓库
# 2.2 创建代理仓库
# 2.3 创建仓库组
# 三、Nexus 相关配置
# 1.配置 Maven 从 Nexus 下载构建
# 1.1 配置 Nexus 仓库
配置 Nexus 仓库有两种方式:
pom.xml: 项目范围~/.m2/setting.xml: 用户范围
# 1.1.1 pom.xml
通过 project 根元素下的 repositories 、pluginRepositories 元素,可以添加 nexus 远程仓库。
这样当 maven 需要下载构建的时候就会从 nexus 下载了,不过 pom.xml 中的配置只对当前项目生效,作用范围是项目范围。
  <!-- 私有仓库 -->
    <repositories>
        <repository>
            <id>RDC thirdparty</id>
            <name>RDC thirdparty Repository</name>
            <url>http://nexus.saas.hand-china.com/content/repositories/thirdparty</url>
        </repository>
    </repositories>

    <pluginRepositories>
        <pluginRepository>
            <id>RDC thirdparty</id>
            <name>RDC thirdparty Repository</name>
            <url>http://nexus.saas.hand-china.com/content/repositories/thirdparty</url>
        </pluginRepository>
    </pluginRepositories>
2
3
4
5
6
7
8
9
10
11
12
13
14
15
16
# 1.1.2 ~/.m2/setting.xml
pom.xml 中的配置只对当前 Maven 项目有效,在实际应用中,我们往往想要通过一次配置就能让本机所有的 Maven 项目都使用自己的 Maven 私服,这时就需要用到 ~/.m2/setting.xml
<settings>
  ...
  <profiles>
     <profile>
       <id>Nexus</id>

       <repositories>
         <repository>
           <id>nexus</id>
           <url>http://nexus.saas.hand-china.com/content/groups/public</url>
           <releases>
             <enabled>true</enabled>
           </releases>
           <snapshots>
             <enabled>true</enabled>
           </snapshots>
         </repository>
       </repositories>

       <pluginRepositories>
         <pluginRepository>
           <id>nexus</id>
           <url>http://nexus.saas.hand-china.com/content/groups/public</url>
           <releases>
             <enabled>true</enabled>
           </releases>
           <snapshots>
             <enabled>true</enabled>
           </snapshots>
         </pluginRepository>
       </pluginRepositories>

     </profile>
   </profiles>

   <activeProfiles>
     <activeProfile>
       Nexus
     </activeProfile>
   </activeProfiles>
...
</settings>
2
3
4
5
6
7
8
9
10
11
12
13
14
15
16
17
18
19
20
21
22
23
24
25
26
27
28
29
30
31
32
33
34
35
36
37
38
39
40
41
42
该配置中使用了一个 id 为 nexus 的 profile,这个 profile 包含了相关的仓库配置,同时配置中又使用 activeProfile 元素将 nexus 这个 profile 激活,这样当执行 Maven 构建的时候,激活的 profile 会将仓库配置应用到项目中去。
# 1.2 配置镜像
配置镜像让 Maven 只使用私服:
可以创建一个匹配任何仓库的镜像,镜像的地址为私服,这样,Maven 对任何仓库的构件下载请求都会转到私服中
<settings>
  ...
  <mirrors>
     <mirror>
       <id>nexus</id>
       <mirrorOf>*</mirrorOf>
       <url>http://nexus.saas.hand-china.com/content/groups/public</url>
     </mirror>
  </mirrors>

  <profiles>
     <profile>
       <id>Nexus</id>

       <repositories>
         <repository>
           <id>central</id>
           <url>http://central</url>
           <releases>
             <enabled>true</enabled>
           </releases>
           <snapshots>
             <enabled>true</enabled>
           </snapshots>
         </repository>
       </repositories>

       <pluginRepositories>
         <pluginRepository>
           <id>central</id>
           <url>http://central</url>
           <releases>
             <enabled>true</enabled>
           </releases>
           <snapshots>
             <enabled>true</enabled>
           </snapshots>
         </pluginRepository>
       </pluginRepositories>

     </profile>
   </profiles>

   <activeProfiles>
     <activeProfile>
       Nexus
     </activeProfile>
   </activeProfiles>
...
</settings>
2
3
4
5
6
7
8
9
10
11
12
13
14
15
16
17
18
19
20
21
22
23
24
25
26
27
28
29
30
31
32
33
34
35
36
37
38
39
40
41
42
43
44
45
46
47
48
49
50
# 2.部署构件至 Nexus
对于一些组织内部发布的,或者一些无法从公共仓库中获得的第三方构件,可以将其部署至 Nexus,供大家下载使用。
用户可以配置 Maven 自动部署构件至 Nexus 的宿主仓库,也可以通过界面手动上传构件。
日常开发生成的快照版本构件可以直接部署到 Nexus 中策略为 Snapshot 的宿主仓库中,项目正式发布的构件则应该部署到 Nexus 中策略为 Release 的宿主仓库中。
# 2.1 配置 Maven 部署构件至 Nexus
# 2.1.1 distributionManagement
在 pom.xm 中通过distributionManagement配置构件要发布至仓库
    <distributionManagement>
        <repository>
            <id>releases</id>
            <url>http://nexus.saas.hand-china.com/content/repositories/panda-release</url>
        </repository>

        <snapshotRepository>
            <id>snapshots</id>
            <url>http://nexus.saas.hand-china.com/content/repositories/panda-snapshot</url>
        </snapshotRepository>
    </distributionManagement>
2
3
4
5
6
7
8
9
10
11
# 2.1.2 servers
Nexus 的仓库对于匿名用户是只读的。为了能够部署构件,还需要在 settings.xml 中配置认证信息。
  <servers>
     <server>
       <id>releases</id>
       <username>hec-deployer</username>
       <password>123456</password>
     </server>
     <server>
       <id>snapshots</id>
       <username>hec-deployer</username>
       <password>123456</password>
     </server>
     <server>
       <id>3rd</id>
       <username>hec-deployer</username>
       <password>123456</password>
     </server>
   </servers>
2
3
4
5
6
7
8
9
10
11
12
13
14
15
16
17
# 2.2 手动部署第三方构件至 Nexus
去 nexus 中操作。