07_基于VuePress和GitHub搭建个人博客站点
[toc]
# 推荐阅读
- vuepress 官方文档 (opens new window)
- vuepress/awesome-vuepress (opens new window)
- vuePress 博客搭建指南 (opens new window)
- vuepress 踩坑记录 (opens new window)
- vuepress + GitHub 搭建个人博客笔记(1) (opens new window)
- 使用 Vuepress 搭建博客 (opens new window)
- VuePress 搭建技术网站与个人博客 (opens new window)
- 当前博客的相关配置_山海以南 (opens new window)
# 推荐视频
# 推荐案例网站
# 一、起步
# 1. 快速上手
## 1.创建并进入博客目录
mkdir vuepress-sample && cd knowledge-hierarchy

## 2.初始化项目, 会创建一个package.json文件
npm init -y

## 3.本地安装 vuepress
npm install -D vuepress

## 4.创建第一篇文档
mkdir docs && echo '# Hello VuePress' > docs/README.md
2
3
4
5
6
7
8
9
10
11
(5)然后在 package.json 中添加一些 scripts
{
  "scripts": {
    "docs:dev": "vuepress dev docs",
    "docs:build": "vuepress build docs"
  }
}
2
3
4
5
6
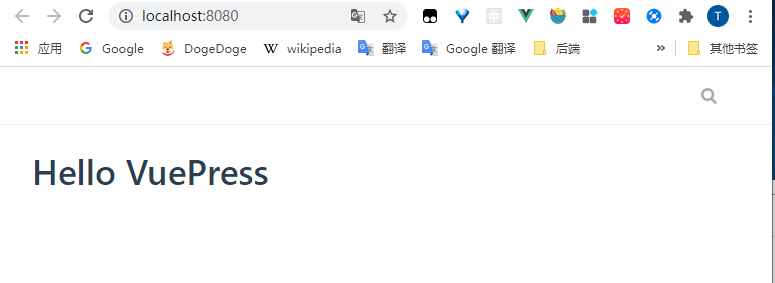
(6)然后通过如下命令,即可在本地启动服务器
npm run docs:dev

success [15:04:28] Build 4675e9 finished in 7196 ms!
> VuePress dev server listening at http://localhost:8080/
2
3
4
# 2.目录结构
VuePress 遵循 “约定优于配置” 的原则,推荐的目录结构如下:
.
├── docs
│   ├── .vuepress (可选的)
│   │   ├── components (可选的)
│   │   ├── theme (可选的)
│   │   │   └── Layout.vue
│   │   ├── public (可选的)
│   │   ├── styles (可选的)
│   │   │   ├── index.styl
│   │   │   └── palette.styl
│   │   ├── templates (可选的, 谨慎配置)
│   │   │   ├── dev.html
│   │   │   └── ssr.html
│   │   ├── config.js (可选的)
│   │   └── enhanceApp.js (可选的)
│   │
│   ├── README.md
│   ├── guide
│   │   └── README.md
│   └── config.md
│
└── package.json
2
3
4
5
6
7
8
9
10
11
12
13
14
15
16
17
18
19
20
21
22
docs/.vuepress: 用于存放全局的配置、组件、静态资源等。docs/.vuepress/components: 该目录中的 Vue 组件将会被自动注册为全局组件。docs/.vuepress/theme: 用于存放本地主题。docs/.vuepress/styles: 用于存放样式相关的文件。docs/.vuepress/styles/index.styl: 将会被自动应用的全局样式文件,会生成在最终的 CSS 文件结尾,具有比默认样式更高的优先级。docs/.vuepress/styles/palette.styl: 用于重写默认颜色常量,或者设置新的 stylus 颜色常量。docs/.vuepress/public: 静态资源目录。docs/.vuepress/templates: 存储 HTML 模板文件。docs/.vuepress/templates/dev.html: 用于开发环境的 HTML 模板文件。docs/.vuepress/templates/ssr.html: 构建时基于 Vue SSR 的 HTML 模板文件。docs/.vuepress/config.js: 配置文件的入口文件,也可以是YML或toml。docs/.vuepress/enhanceApp.js: 客户端应用的增强。
# 3.默认的页面路由
此处我们把 docs 目录作为 targetDir (参考 命令行接口 (opens new window)),下面所有的“文件的相对路径”都是相对于 docs 目录的。在项目根目录下的 package.json 中添加 scripts :
{
  "scripts": {
    "dev": "vuepress dev docs",
    "build": "vuepress build docs"
  }
}
2
3
4
5
6
对于上述的目录结构,默认页面路由地址如下:
| 文件的相对路径 | 页面路由地址 |
|---|---|
/README.md | / |
/guide/README.md | /guide/ |
/config.md | /config.html |
# 4.基本配置
现在让我们来添加一些配置,从而让我们的网站丰富起来。
(1)创建一个 .vuepress 目录,所有 VuePress 相关的文件都将会被放在这里,你的项目结构可能是这样:
.
├─ docs
│  ├─ README.md
│  └─ .vuepress
│     └─ config.js
└─ package.json
2
3
4
5
6
(2)一个 VuePress 网站必要的配置文件是 .vuepress/config.js,它应该导出一个 JavaScript 对象:
module.exports = {
  title: "Hello VuePress",
  description: "Just playing around",
};
2
3
4
对于上述的配置,如果你运行起 dev server,你应该能看到一个页面,它包含一个页头,里面包含一个标题和一个搜索框。VuePress 内置了基于 headers 的搜索 —— 它会自动为所有页面的标题、h2 和 h3 构建起一个简单的搜索索引。

其他可配置项参见:配置 (opens new window)
# 4.1 导航栏配置
# 4.1 导航栏 Logo
// .vuepress/config.js
module.exports = {
  themeConfig: {
    logo: "/assets/img/logo.png",
  },
};
2
3
4
5
6
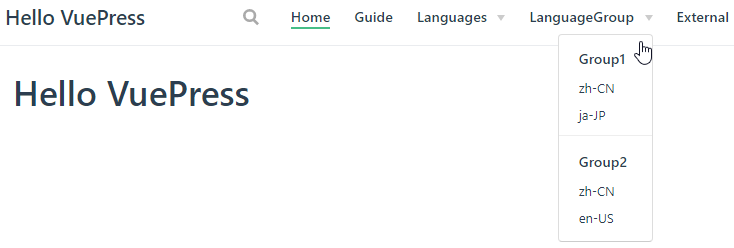
# 4.2 导航栏链接
// .vuepress/config.js
module.exports = {
  themeConfig: {
    // 导航栏链接
    nav: [
      { text: "Home", link: "/" },
      // 配置单个链接
      { text: "Guide", link: "/guide/" },
      // 当提供了 items 数组时,将显示成一个下拉列表
      {
        text: "Languages",
        ariaLabel: "Language Menu",
        items: [
          { text: "Chinese", link: "/language/chinese/" },
          { text: "Japanese", link: "/language/japanese/" },
        ],
      },
      // 通过嵌套的 items 可以在 下拉列表 中设置分组
      {
        text: "LanguageGroup",
        items: [
          {
            text: "Group1",
            items: [
              { text: "zh-CN", link: "/language/chinese/" },
              { text: "ja-JP", link: "/language/japanese/" },
            ],
          },
          {
            text: "Group2",
            items: [
              { text: "zh-CN", link: "/language/chinese/" },
              { text: "en-US", link: "/language/japanese/" },
            ],
          },
        ],
      },
      // 配置外部链接
      {
        text: "External",
        link: "https://google.com",
        target: "_self",
        rel: "",
      },
    ],
  },
};
2
3
4
5
6
7
8
9
10
11
12
13
14
15
16
17
18
19
20
21
22
23
24
25
26
27
28
29
30
31
32
33
34
35
36
37
38
39
40
41
42
43
44
45
46
47
导航栏显示效果如下:
# 4.3 禁用导航栏
你可以使用 themeConfig.navbar 来禁用所有页面的导航栏:
// .vuepress/config.js
module.exports = {
  themeConfig: {
    navbar: false,
  },
};
2
3
4
5
6
你也可以通过 YAML front matter 来禁用某个指定页面的导航栏:
---
navbar: false
---
2
3
4
# 4.2 侧边栏
如果你想为不同的页面组来显示不同的侧边栏,首先,将你的页面文件组织成下述的目录结构:
.
├─ README.md
├─ contact.md
├─ about.md
├─ foo/
│  ├─ README.md
│  ├─ one.md
│  └─ two.md
└─ bar/
   ├─ README.md
   ├─ three.md
   └─ four.md
2
3
4
5
6
7
8
9
10
11
12
接着,遵循以下的侧边栏配置:
// .vuepress/config.js
module.exports = {
  themeConfig: {
    sidebar: {
      "/foo/": [
        "" /* /foo/ */,
        "one" /* /foo/one.html */,
        "two" /* /foo/two.html */,
      ],

      "/bar/": [
        "" /* /bar/ */,
        "three" /* /bar/three.html */,
        "four" /* /bar/four.html */,
      ],

      // fallback
      "/": [
        "" /* / */,
        "contact" /* /contact.html */,
        "about" /* /about.html */,
      ],
    },
  },
};
2
3
4
5
6
7
8
9
10
11
12
13
14
15
16
17
18
19
20
21
22
23
24
25
# 5.相关插件
推荐阅读:
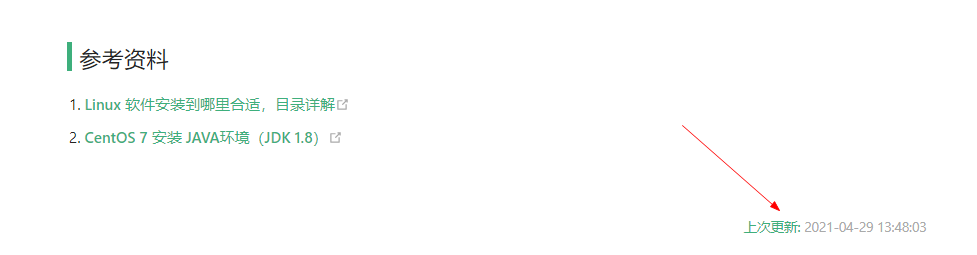
# 5.1 最后修改时间
- 作用:转换文章上次更新日期的格式
- 插件地址:@vuepress/plugin-last-updated (opens new window)
首先安装 moment 来转换日期格式
npm install moment --save
然后配置插件:
const moment = require("moment");

module.exports = {
  plugins: [
    [
      "@vuepress/last-updated",
      {
        transformer: (timestamp, lang) => {
          // 不要忘了安装 moment
          const moment = require("moment");
          moment.locale(lang);
          return moment(timestamp).fromNow();
        },
      },
    ],
  ],
};
2
3
4
5
6
7
8
9
10
11
12
13
14
15
16
17
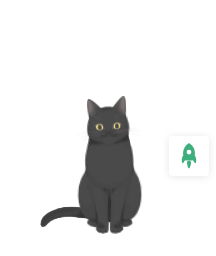
# 5.2 kanbanniang
(1)先本地安装
npm install -D @vuepress-reco/vuepress-plugin-kan-ban-niang
(2)然后配置插件
module.exports = {
  plugins: [
    [
      "@vuepress-reco/vuepress-plugin-kan-ban-niang",
      {
        theme: ["miku"],
        clean: true,
        modelStyle: {
          right: "50px",
          bottom: "10px",
          opacity: "0.9",
        },
      },
    ],
  ],
};
2
3
4
5
6
7
8
9
10
11
12
13
14
15
16
页面右下角会出现一只小猫:
# 5.3 代码复制
本地安装:
npm install -D vuepress-plugin-nuggets-style-copy
然后配置插件:
module.exports = {
  plugins: [
    [
      "vuepress-plugin-nuggets-style-copy",
      {
        copyText: "复制",
        tip: {
          content: "复制成功!",
        },
      },
    ],
  ],
};
2
3
4
5
6
7
8
9
10
11
12
13
效果如下:

# 5.4 vuepress-plugin-cursor-effects
本地安装:
npm install -D vuepress-plugin-cursor-effects
然后配置插件:
module.exports = {
  plugins: [
    [
      "vuepress-plugin-nuggets-style-copy",
      {
        copyText: "复制",
        tip: {
          content: "复制成功!",
        },
      },
    ],
  ],
};
2
3
4
5
6
7
8
9
10
11
12
13
效果如下:
# 5.5 支持中文文件名
当文件名含有中文时,对应页面无法跳转,可通过如下插件解决这个问题
本地安装:
npm install -D vuepress-plugin-permalink-pinyin
然后配置插件:
module.exports = {
  plugins: [
    // 支持中文文件名
    [
      "permalink-pinyin",
      {
        lowercase: true, // Converted into lowercase, default: true
        separator: "-", // Separator of the slug, default: '-'
      },
    ],
  ],
};
2
3
4
5
6
7
8
9
10
11
12
# 5.6 自动生成侧边栏
本地安装:
npm install -D vuepress-plugin-auto-sidebar
然后配置插件:
module.exports = {
  plugins: {
    "vuepress-plugin-auto-sidebar": {},
  },
};
2
3
4
5
# 5.7 pwa
本地安装:
npm install -D @vuepress/plugin-pwa
然后配置插件:
module.exports = {
  plugins: [
    // 支持pwa
    [
      "@vuepress/pwa",
      {
        serviceWorker: true,
        updatePopup: {
          message: "发现新内容可用.",
          buttonText: "刷新",
        },
      },
    ],
  ],
};
2
3
4
5
6
7
8
9
10
11
12
13
14
15
# 5.8 markdown 相关插件
# 5.8.1 支持 PlantUml
- 作用: 支持 PlantUml
- 插件地址:https://github.com/gmunguia/markdown-it-plantuml (opens new window)
(1)安装与配置
本地安装:
npm install -D markdown-it-plantuml-ex
然后配置插件:
module.exports = {
  markdown: {
    lineNumbers: true,
    extendMarkdown: (md) => {
      md.set({ breaks: true });
      md.use(require("markdown-it-plantuml-ex"));
    },
  },
};
2
3
4
5
6
7
8
9
(2)演示
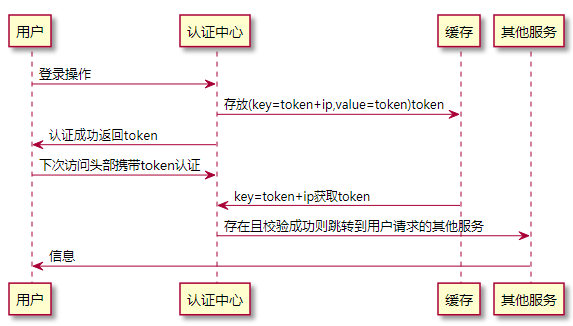
```plantuml
@startuml
用户 -> 认证中心: 登录操作
认证中心 -> 缓存: 存放(key=token+ip,value=token)token
用户 <- 认证中心 : 认证成功返回 token
用户 -> 认证中心: 下次访问头部携带 token 认证
认证中心 <- 缓存: key=token+ip 获取 token
其他服务 <- 认证中心: 存在且校验成功则跳转到用户请求的其他服务
其他服务 -> 用户: 信息
@enduml
```
2
3
4
5
6
7
8
9
10
11
12
13
14
# 6.VuePress 热更新
# 7.GitHub Pages and Travis CI 自动化部署
(1)在项目的根目录创建 .travis.yml
参考 travis-ci (opens new window) 来配置,或者复制下面的配置
language: node_js
node_js:
  - lts/*
install:
  - yarn
cache:
  directories:
    - node_modules
script:
  - yarn build
deploy:
  committer_from_gh: true
  provider: pages
  skip-cleanup: true
  local_dir: dist
  github-token: $GITHUB_TOKEN
  keep-history: true
  on:
    branch: master
2
3
4
5
6
7
8
9
10
11
12
13
14
15
16
17
18
19
- 进入
github (opens new window)
获取 token
settings -> Developer settings -> Personal access tokens -> Generate new token
输入 Note 同时勾选所有 -> Generate token
复制 token
进入
travis ci (opens new window)
创建
GITHUB_TOKEN
- 进入你对应仓库的 settings
- 在 Environment Variables 下面的 NAME 中输入
GITHUB_TOKEN,在 VALUE 中粘贴从 github 中复制的值 - 点击 add 增加环境变量
# 二、相关异常
# 1.中文路由导致 RangeError: Maximum call stack size exceeded
(1) 异常信息
RangeError: Maximum call stack size exceeded
(2) 异常原因
包含中文路由
(3)异常解决